The following article outlines how to create Opening Balances for your KashFlow account using the Trial Balance data of your previous bookkeeping and/ or accounting system.
Step 1 – Check your nominal codes
Once you have your Trial Balance from your old accounting system you would need to check that you have the same relevant codes set up within KashFlow.
You can do this by going to Settings > Chart of Accounts. On this screen you may see a list of some default nominal codes, but if you would like to add more you can do this by scrolling to the bottom of the screen and you will see the option to add a new code.
You will also need to create a code for your Debtor and Creditor Control Accounts as you are unable to post Journal entries directly to these codes on the opening balance journal. You can create a new code called “Opening Balances” or you can create a “Suspense” account.
When creating a new code, you will be asked to select the “Type”. This “Type” will determine if this nominal code will appear on the Balance Sheet or the Profit and Loss report, and on which section of that report it will appear.
If you would like the nominal code to appear on the Profit and Loss report you will need to select either Turnover, Cost of Sale or Expenditure.
If you would like the nominal code to appear on the Balance Sheet you will need to select either Fixed Asset, Current Asset/Liability or Capital & Reserves.
Whilst in this screen, you will also need to change a setting under Show Advanced Configuration Options at the bottom of the screen. You will need to select the following options:
- Allow me to access all codes in all areas – not just Sales Codes in the Sales area and so on.
- Allow me to configure Fixed Assets, Cost of Sale (etc) options directly on the page where I edit nominal codes instead of just from this page
- Enable the journal (a link will show in the main menu for it)
Once you have ticked these options, then you can go to click Update.
You have now enabled the Journal, enabled all types of Nominal Codes to be accessed in all areas, and created an Opening Balance code/Suspense Account.
Please note, the Name and Code can be anything you want to best suit your preferred method of record keeping.
Step 2 – Entering the Journal
The next step is to enter in the Opening Balance Journal. This is your Trial Balance as of the date you are switching from your previous accountancy software to KashFlow.
Start by going to Journals > +Create.
- Date – this needs to be the date of your Trial Balance, or the date you wish to start recording data within KashFlow
- Category – this should be “Standard Journals”
- Comment – Enter ‘Opening Balances’ or anything you feel best represents the journal for your records
When ready, click Create Journal.
Using the next page to enter in your opening balance journal, you would need to work through the lines on your Trial Balance report and select the relevant nominal code as per that line.
The information needed on the journal entry line is as follows:
- Type – Select the Nominal Code using this drop down (for instance, if you wish to define an Opening Balance for your default Bank Account you may select Nominal Code “1200 – …”)
- Narrative – This will simply be the Description of the monetary movement when viewing the Nominal Codes history
- Debit – This is the column you will put in any amounts you wish to give the Nominal Code account
- Credit – This is the column you will put in any amounts you wish to take from the Nominal Code account
Example:
Please note, a Journal must always balance, as if values are supplied to one account they must be recorded as being taken from another, the reverse also applies.
Step 3 – Debtor Control Account Balance
There are two ways you can do this; one is to create one bulk amount, or you can set the opening balance per customer record.
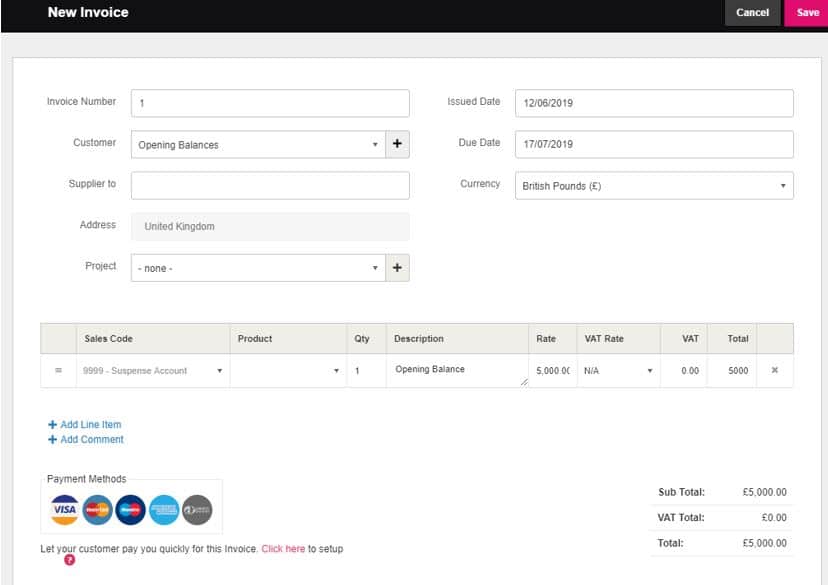
If you wish to do this as one bulk amount, you will need to go to Customers > + Create and Name the customer “Opening Balance”.
You will then need to create an invoice for this customer by going to Invoices > + Create. When you click on “Add Line Item” you will then need to select the same code as used on your opening balance journal (“Opening Balance” or “Suspense”). You will need then need to enter the following details:
- Sales Code – Select Opening Balance code or Suspense code
- Rate – This should be the amount of your Debtors figure
- VAT Rate – This should be N/A as the VAT will already be accounted for in your Opening Balance Journal (if you are recording the Opening Balances of your VAT Liabilities, too)
When ready, click Save. Your Trial Balance for the Debtors Control Account will now have this figure recorded.
If you wish to record this per customer, you will need to setup your customer records by going to Customers > + Create and enter the details.
You will then need to create an invoice for each customer, using the same method as above by clicking on “Add Line Item” and select the same code as used on your opening balance journal for the Debtor Control Balance.
Example:
Step 4 – Creditor Control Account Balance
There are two ways you can do this; one is to create one bulk amount, or you can set the opening balance per supplier record.
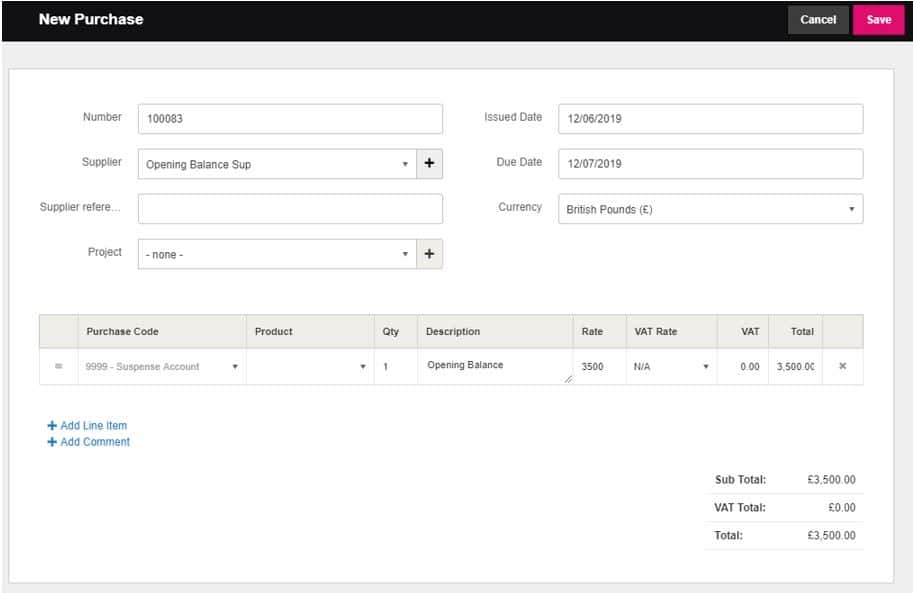
If you wish to do this as one bulk amount, you will need to go to Suppliers > + Create and Name the supplier “Opening Balance”.
You will then need to create a purchase for this supplier by going to Purchases > + Create. When you click on “Add Line Item” you will then need to select the same code as used on your opening balance journal (“Opening Balance” or “Suspense”). You will need then need to enter the following details:
- Purchase Code – Select Opening Balance code or Suspense code
- Rate – This should be the amount of your Creditors figure
- VAT Rate – This should be N/A as the VAT will already be accounted for in your Opening Balance Journal (if you are recording the Opening Balances of your VAT Liabilities, too)
When ready, click Save. Your Trial Balance for the Creditor Control Account will now have this figure recorded.
If you wish to record this per supplier, you will need to setup your supplier records by going to Suppliers > + Create and enter the details.
You will then need to create an invoice for each supplier, using the same method as above by clicking on “Add Line Item” and select the same code as used on your opening balance journal for the Creditor Control Balance.
Steps Completed
All steps are now completed. You can go to Reports > Business > Nominal Ledger report to view all of your nominal codes to check that they have been assigned the right opening balance.
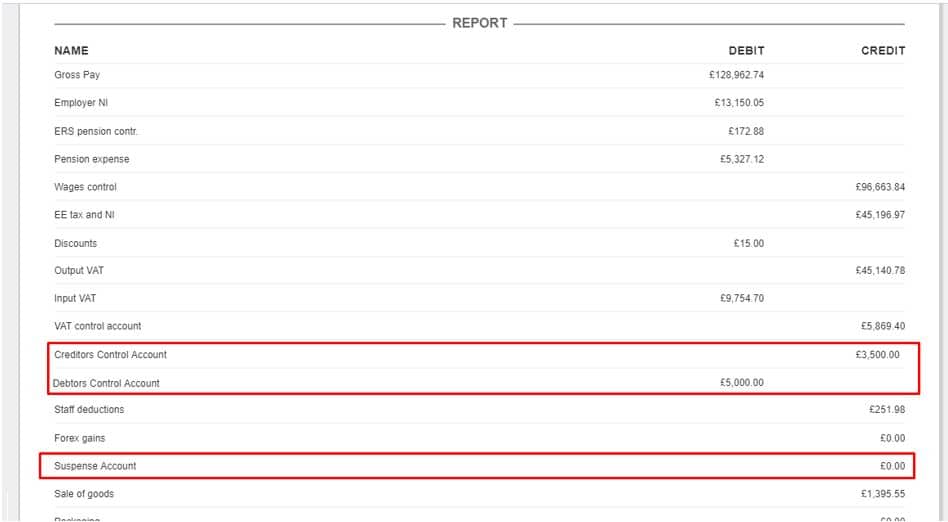
When you see the amounts for the Debtor and Creditor Control account you will see that the balance of that code is now zero.
You can also print the Trial balance report within KashFlow by going to Reports > Financial > Trial Balance. Here you will see that the Debtor and Creditor Control Accounts are now showing with the correct opening balances.
If you are on the Cash Accounting scheme then you may wish to take a look at this knowledge base article as there are additional steps you will need to take.


